|
Ford Crown Victoria / Mercury Grand Marquis
Front Speaker Replacement Instructions
|
Removal and Replacement Instructions
(steps 11-20 of 20)
- Before re-installing the door panel it's a good idea to test the speaker to make sure it's working correctly.
To that end, temporarily re-connect the negative battery cable and turn on the radio to verify the newly-installed
speaker works and sounds as it should. If it doesn't re-check your wiring.
- Disconnect the negative battery terminal.
- Holding the door panel up near the door, re-connect the courtesy light connector.
- Re-attach the door panel by sliding it down onto the door making sure the bottom hooks are in their mounting holes
and that the door lock pin is lined up. You'll also need to insert the door handle through it's opening in the door panel.
- Re-install the retaining screw that is below the door handle and behind the switch plate.
- Re-connect the switch plate connector and snap the switch plate back into place.
- Re-install the retaining screw at the lower rear portion of the door panel. As mentioned before, some older models
also have retaining screws at the upper-right portion of the door panel and in the map pockets. If your car does and you
removed those as well re-install them now.
- Re-install the screws securing the door pull (if so equipped) and replace the door pull screw covers by simply
pushing them in.
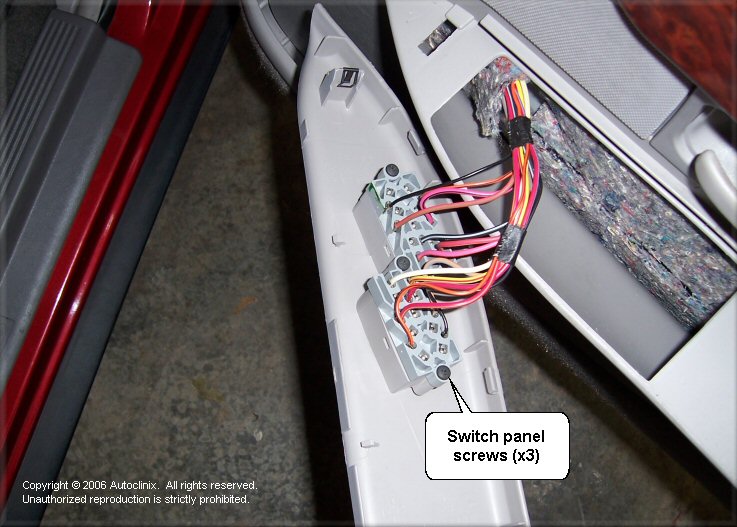
- Repeat steps 2-19 for the passenger-side door. Note that the passenger side door switch panel differs from the
drivers side door setup in that the switch connector is attached with three (3) screws (see picture below).
- After completing the passenger-side speaker installation re-connect negative battery terminal.
Turn on the radio and double check the everything sounds as it should. If not, refer to the
Troubleshooting section for this repair/upgrade.
If your rear speakers sound clear and full, congratulations! You've now successfully upgraded your rear speakers and
are ready to play some tunes. Also, if you haven't already, you'll probably want to upgrade your rear
speakers as well. We've got detailed instructions for that upgrade as well. Just
click here for details on upgrading the rear speakers. Lastly, please take a minute to drop us a line
and give us some feedback
on the content of this site. We're always trying to improve our content and we love getting feedback from
fellow Do-It-Yourselfers
|

Back to Autoclinix.com
|

Next
|
Copyright © 2006-2010 by AutoClinix. All rights reserved. Unauthorized duplication in whole or in part is strictly prohibited.
|
|